Introduction
Important: this post follows the part 1 of this series.
In this post we’ll see how to use third-parties libraries to our project and how to use those in our Web resource.
When developing an HTML Web resource you can easily refer to a third-party library by adding a script tag pointing either to a CDN or to a copy of the library that you can upload as a JavaScript Web resource.
In case of a JavaScript Web resource used in a form you can register your third-party library in the form and you can call it from your JavaScript Web resource.
So in theory we’re covered but those methods have some drawbacks:
- You cannot add multiple versions of the same library in the same form.
- Some libraries are not available as standalone JavaScript files, they need to be imported and bundled.
- You should probably include the version of the library in the Web resource name and you’ll have to manually add the new Web resource in every form when upgrading to a newer version.
That’s why we’ll see a more modern way of integrating libraries in our project. The approach we’ll take involves using the webpack bundler. Webpack will enable us to resolve the required dependencies and bundle your code with the dependencies (third-party libraries) in a single JavaScript file while making sure our code won’t conflict with anything else.
The code of the sample project can be found here.
Adding and configuring webpack
We’ll start by installing webpack and ts-loader. ts-loader is a webpack plugin that adds TypeScript support when using webpack.
npm i --save-dev webpack webpack-cli ts-loaderThen add a webpack.config.js file in the project’s root directory with the following content:
That deserves a little explanation:
- Lines 4 to 6: we add one entry point per TypeScript file to generate separate JavaScript files. For now we only have one. The name “www_contactform” will be used as the generated filename.
- Lines 10 to 14: configuration required to handle TypeScript files with webpack. We shouldn’t have to edit this section. Official documentation can be found here.
- Lines 23 to 26: this one is a little bit tricky if you’re not familiar with webpack. Please read below.
Library config
Usually webpack is used to bundle your code in a single file that can be loaded in your web application. The code is bundled in a way it cannot interfere with other libraries that would be loaded in the application. What this means is that the code will execute but won’t be accessible by code outside of the generated library.
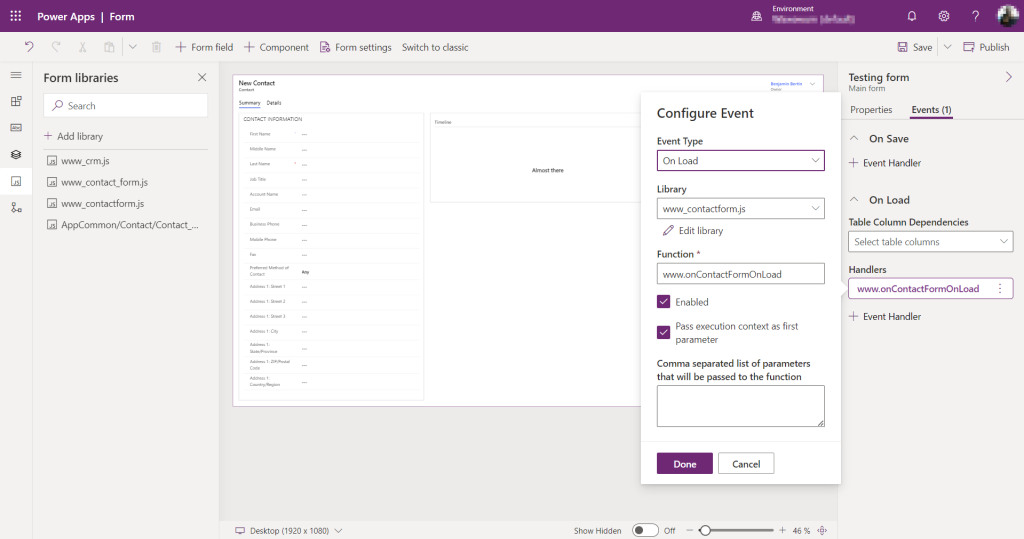
That’s unfortunate since this is precisely what your Model-Driven App will try to do when adding an event in a form (On Save Event or On Load Event): access a specific function declared in your library. The function that is specified when adding the event must be declared in the Global scope.
Lucky for us, the library option of the webpack config is here to solve that issue. It allows us to export our code in the Global scope. The name property specifies the name of the global variable that will contain our code and the type property will avoid conflict if we decide to add another entry point.
Based on our configuration and code, the onContactFormLoad function defined in contactForm.ts will be accessible through www.onContactFormLoad.
Note: I’ve used www since this is the prefix I use for all my solutions but you may change it by yours.
Exporting onContactFormLoad
We also have to mark the onContactFormLoad function with the export keyword. That will tell webpack and ts-loader to make our function available in the www object. If you want to know more about the export keyword you should read the module documentation of TypeScript.
Update the contactForm.ts file:
Making sure everything still works
Before adding a third party library we’ll check if everything is still working since webpack changed the way the code is generated. We’ll also edit the package.json file to replace typescript by webpack:
    "scripts": {

        ...
        "build": "webpack"

        ...
    },
Then, build the project:
npm run buildIf you open the generated file you should obtain something like that:
(()=>{var e={d:(o,t)=>{for(var r in t)e.o(t,r)&&!e.o(o,r)&&Object.defineProperty...This is perfectly fine and we don’t have to deal with the content of this file.
We can update the web resource file in our Dataverse / Dynamics 365 environment and update the On Load event in the form since the onContactFormLoad function is now declared in the www object.
The notification should still be displayed after saving, publishing and refreshing the form.
Adding a third-party library
We’re actually back to where we were in part 1 of this tutorial except we now use webpack. Now that the plumbery is in place we can start adding a third-party library. We’ll use lodash in this example but all the following steps would be almost exactly the same for any other library. When in doubt you should read the library’s documentation.
Let’s start by adding a dependency to lodash in our project and add the types:
npm i lodash
npm i --save-dev @types/lodash
Then we’ll have to import lodash in the contactForm.ts file by adding the following line at the top of the file (don’t panic, an error will be displayed, keep reading):
import * as _ from 'lodash';If you get the “Cannot find module ‘lodash’. Did you mean to set the ‘moduleResolution’ option to ‘node’, or to add aliases to the ‘paths’ option?” error, edit the tsconfig.json file and add the moduleResolution option.
{
    "compilerOptions": {
        "outDir": "dist",
        "target": "ES6",
        "moduleResolution": "node"
    },
    "include": [
        "src/**/*"
    ]
}
The moduleResolution option tells the compiler how to resolve import statements which is precisely what we used in our contactForm.ts file. You can find more information here about the moduleResolution option.
Go back to the contactForm.ts file and the error should have disappeared.
We can now add some code using lodash in our onContactFormLoad function:
After building the project and updating the Web Resource in the Dataverse environment the Contact form should display the notification containing the list of technologies in a random order:

Adding “Namespaces” to the mix
Everything works as expected and you could totally stop here and use that project to develop all your Web Resources. Nonetheless if you end up having dozens or even hundreds of functions exposed into a single top-level object (www in our example) your code may be difficult to maintain.
So the goal of this section is to transform something like this:
In a www_contactform.js file (generated file):
www.onContactFormLoad = function() { ... }
www.onContactFormSave = function() { ... }
www.onContactFormFirstNameChange = function() { ... }
www.onContactFormLastNameChange = function() { ... }

In a www_accountform.js file (generated file):
www.onAccountFormLoad = function() { ... }
www.onAccountFormSave = function() { ... }
www.onAccountPrimaryContactChange = function() { ... }
... you get the idea
Into something like this:
In a single www_crm.js file (generated file):
www.CRM.Contact.onFormLoad = function() { ... }
www.CRM.Contact.onFormSave = function() { ... }
www.CRM.Contact.onFirstNameChange = function() { ... }
www.CRM.Contact.onLastNameChange = function() { ... }
www.CRM.Account.onFormLoad = function() { ... }
www.CRM.Account.onFormSave = function() { ... }
www.CRM.Account.onPrimaryContactChange = function() { ... }
First we’ll organize the project a little bit better. We’ll create a contact folder in ./src and we’ll move contactForm.ts inside it.
Then, add a crm.ts file in ./src with the following content:
As you can see we use that file to construct an object that will act as a namespace. I choose to name that object CRM in this example but it can be anything. For every additional file that you want to make available in your library you would have to import it in crm.ts and expose it through a property in the CRM object.
Now we need to update webpack.config.js to change our entry point:
As you can see the 5th line has been changed. The entry point’s name also changed from www_contactform to www_crm. That will impact the name of the generated file to better represent the fact we’ll have a single file for all our JavaScript code (utilities, forms, view functions…).
Also, since we are now importing contactForm.ts in www.CRM.Contact we’ll rename onContactFormLoad to onFormLoad to avoid repetition.
About the single generated file
Until now we had only one file containing our logic: contactForm.ts. Of course we could have added other files, probably one per entity and type of logic (form, view function, custom action logic…) and we would have got one generated file (.js) per code file (.ts). For each new code file we would have added one entry point in the webpack.config.js file.
Unfortunately that method doesn’t work when creating namespaces. I won’t go into more details about the reason why because this is not what this post is about but we really need to bundle all our files into a single output to make sure we don’t end up with conflicts.
That being said, is one single file an issue? When developing a Single Page Application (SPA) it’s a common practice but here we’re working in a different context. Let’s do some pros and cons.
Pros:
- Less JavaScript Web resources to upload in your solution (easier to maintain and deploy).
- Less libraries to add to your forms (less configuration required).
Cons:
- Generates bigger Web resources, you may have to increase the Web resources size limit.
- It may be difficult to remove your Web resource to an environment since a lot of components will depend on it.
At the end of the day I think the pros outweigh the cons but you may think otherwise depending on your context.
Testing
To test our changes we can now run the build, and replace our www_contactForm.js Web resource by the www_crm.js one. Don’t forget to update the library in the Contact form and update the On Load event to call www.CRM.Contact.onFormLoad.
After saving and publishing those changes you should still see the notification displayed in the Contact form.
Conclusion
That concludes the part 2 of this series. Adding and configuring webpack can be challenging when you’re not used to it but that’s why you’re here right? At the end of the day I really think the effort needed is totally worth it since it enables you to add and use any node package very easily in your logic. Moreover by using TypeScript and webpack to bundle your code into one single file you make sure you won’t create any conflict between different modules.
Stay tuned for the last part of this series in which we’ll see how to use our project to generate JavaScript Web resources that can add logic to an HTML Web resource.